Alexander Mc Queen DIY
Today I saw my favourite shoes on Shoeperwoman: The Spring/ Summer 2011 Sarah Burton for Alexander Mc Queen shoes. They are truly fabulous! Here they are in white:
今日はShoeperwomanのブログで私の一番好きな靴をみました:Alexander Mc Queen の新しいデザイナーSarah Burtonの春夏2011コレクションのサンダル。本当に素晴らしい靴ですよね!こちらは白いバージョンの写真:
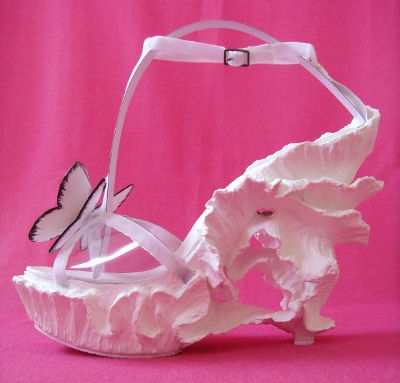
I was in love with these the moment I saw them on my screen some months ago…..as so often, they are unattainable – as much as I looked, I didn’t have some unneeded 3,000 USD lying around! So, what’s a girl in love to do? …crazy as I am, I decided to try a DIY, and here’s the end result:
この靴は私にとって一目惚れでした。。。よくあることですが、とても手の届かない値段でした – いくらさがしても、いらない3,000ドルを見つかりませんでした!それで、愛におちてる女はどうすればいいのか?。。。ちょっとクレイジーな私はDIYでもしようかなーと思いました。そのアイディアの結果はこちらです:

I know they’re not the same, but considering they’re handmade, I’m pretty satisfied with them….and here’s how I made them:
まったく同じではないということは分かっているが、手作りだと思うとかなり満足しています。。。このように作りました:
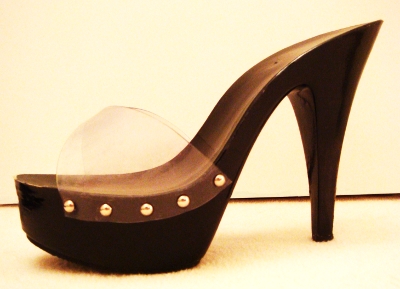
As a base I took this unused pair of “stripper” style shoes (bought long ago on a holiday for fun….):
ベースとしては使わなかった”ストリッパー・スタイル”の靴(何年まえに旅行中に買ってしまった。。。)を使いました:
And then I used the following items to make the leaf-like decoration and butterfly on the shoe: Cardboard, acrylic paint, and copic markers for the butterfly. Aluminium foil, acrylic paste and acrylic paint for the leaf-shapes.
リーフみたいなデコレーションと蝶々を作るためにこれらのものを使いました:蝶々はダンボール、アクリル・ペイントとコピック・マーカで作りました。リーフはアルミホイル、アクリル・ペーストとアクリル・ペイントで作りました。
First, I made a white sole with rubber foam and fabric which I glued to the shoe, also attaching the back part. Then, I used velvet ribbon and glued it to the plastic upper to create the “straps”. Over that I painted the acrylic paste using layers to create depth. Mostly I made a basic shape from aluminium foil and then used acrylic paste to attach it to the shoe and cover it as well as create a structure. I did the detailed structure with acrylic paint.
最初はインソールをフォームと布で作って、のりで靴につけました。そのついでにバックの部分もつけました。次はベルベット・リボンをのりでストラップみたいに靴の透明のアッパーにつけました。そして、アクリル・ペーストでリーフ風の形をぬりました。ほとんどの部分は、最初にアルミホイルでベースの形をつくって、それをアクリル・ペーストで靴につけて、その上に同じペーストでまた形をぬりました。細かい仕上げにはアクリル・ペイントをつかいました。
After that I sewed on the rest of the straps: the ankle and t-bar strap. And finally I sewed on the butterfly.
その後、残りのストラップをぬいました:あしくびとTバーのストラップ。最後に蝶々を靴にぬいつけました。
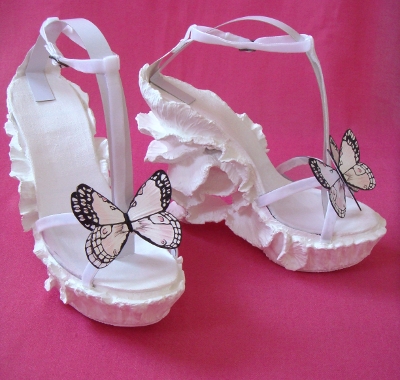
Here are some pictures of the final result:
出来上がった靴です:
And this is how they look like when worn:
はいた時のみため:
All in all, they’re of course not the same thing as the original – I also changed the shape to fit my base shoe – but I like them! I have no idea how much wear they would withstand….I guess they’re definitely not made for walking on cobblestone roads, but they should be fine for an indoors party or a similar event! What do you think?
結局、この靴はもちろんオリジナルと同じ物ではありませんが – ベースの靴にあわせて、形も少し変更しました – それでも好きです!どれぐらいこわれやすいのは分かりません。。。外で歩くにはあまりよくないと思いますが、室内のパーティーなどのためには使えそうです!このDIYはどう思いますか?


